
Click Here To Return To Brick Row Home Page
This tutorial is a very basic overview of FrontPage Express. FrontPage Express is a HyperText Markup Language (HTML) Editor. With it, you can create and post personal or departmental webpages on the Internet. This purpose of this tutorial is to help you learn how to use FrontPage Express and, with additional tutorials, create a website. This is by no means a comprehensive tutorial. However, we will provide you with enough information to create informational and attractive webpages.
FrontPage Express is very similar to Word97.
Toolbar
Back up to
where you were at

(Your tool bar may be arranged
different or have some components missing. You can fix this by
choosing View from the menu bar and selecting
all toolbars.)
Entering text into a webpage is much like entering text into a word processor. Simply type the text you want to appear and then use the following steps to spice it up.
Layout
The text on your webpage doesn't have to all be in paragraph
blocks. You do something:
| Brick Row Technical Services Town of Coeymans Selkirk, NY 12158 |
This is
called a Line Break. To create a line break, simply hold down the SHIFT key
and press ENTER. In FrontPage Express, Line Breaks are denoted by a ![]() .
.
If you want to double space, do not hold the shift key down.
Alignment
You can align text and pictures to the right, center, or
left of your webpage. To do this, highlight the text or
picture you want to move and click on either the right,
center, or left buttons on the toolbar. If you haven't
started typing the text, just click on either the right,
center, or left buttons and the cursor will move to that
part of the page. (labeled above in purple)
Indents
You can indent blocks as text as well. To indent
some text, click the Increase Indent Icon on the toolbar. To out-dent or unindent some
text, click the Decrease
Indent Icon on the
toolbar. When you indent or out-dent a block of text, the
entire paragraph that the text is in is indented or
out-dented. So be careful when using indent and out-dent,
especially inside of lists. (labeled above in maroon and grey)
| Numbered List | Bulleted List |
|
|
To make a list, select either the Numbered List or Bulleted List Icon from the toolbar. Type the text of the first list item. When you hit ENTER, the cursor drops down to the next line (not a new paragraph) and another number or bullet appears for the next list item. To end the list, press ENTER after you've typed the last list item. Then, deselect the selected List Icon. The cursor will then drop down to a new paragraph and will be out-dented to the indent before the list was started. (labeled above in teal and aqua)
In the case of outlines, you may want to nest lists, or have a list inside of another list. It would look something like this
- Computer Science Department
- Work Study
- Wine Garten
- Loose Lips
- Part-time Employees
- Melba Toast
- Lou Linguini
- Staff
- Casper Milqtoast
- JSink Ships
- Jimmy Johnson
- Some other department
and so...
build a nested list, start by creating the top most list, or parent. (In the case above, you'd make a Numbered List and type in the first item.) Then to make a sub-list of that item, do the following:
- Press ENTER after typing in the list item of the parent list.
- Click the Increase Indent Icon.
- Select the either the Numbered List or Bulleted List Icon from the toolbar. (In the case above, you'd select Numbered List.)
- Type in the first item of the nested list.
To end a sub-list and return to its parent list (In the example above, end the list containing Mike Loosbrock and Matt Christians and get back to list containing Work Study, Part-Time Employees, and Staff), do the following:
- Press ENTER after typing in the last item of the sub-list.
- Either press BACKSPACE twice, or click the Decrease Indent Icon twice.
You can insert images (*.gif, *.jpg, *.bmp) into your webpage. Keep in mind that you need to keep your images realitively small in size, otherwise, your pages will take a long time to download.
To insert an image, put your cursor where you want to place the image and then:
The image should appear on the webpage. After you have placed the image on the webpage, you can change the attributes of the image by right clicking on the image and choosing Image Properties.
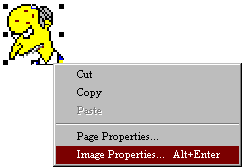
The Image Properties Dialog Box appears. Choose the Appearance Tab.
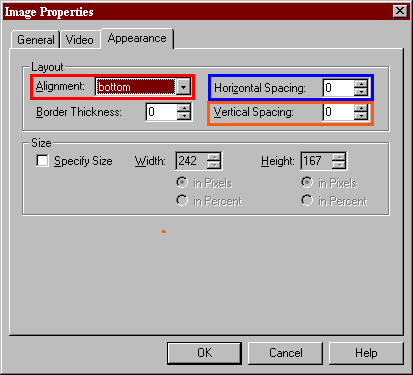
Alignment
The Alignment property allows you to set how the
image is aligned vertically in respect to the line of text it is
embedded in. For example: (labeled above
in red)
Bottom Align |
Middle Align |
Top Align |
bottom |
middle |
top |
You can also align the image horizontally:
Left Align |
Right Align |
When you insert an image in text, the image appears where the cursor is when you click the Insert Image Icon. When you either right or left align an image in a line of text, the image defaults to 'top align' in the line you inserted the image. You also horizontally align the image using the Alignment Icons (labeled above in purple) on the toolbar. However, you can't center the image in a line of text, only left and right will work. If you have an image not embedded in text, you can horizontally align it left, right, and center. This can be accomplished by using either the Image Properties Dialog Box or the Alignment Icons on the toolbar.
left align
![]()
center align
![]()
right align
![]()
Vertical and Horizontal
Spacing
When you embed an image in some text, you may or may
not want the text to be wrapping tightly around the image. To change how much
space is left along the top and bottom or along the sides, change the Vertical and
Horizontal
Spacing properties. The spacing is measured in pixels. (labeled above in
orange and blue)
|
Vertical Spacing | |
|
Text with a vertical spacing of 0 pixels: |
Text with a vertical spacing of 10 pixels: |
|
Horizontal Spacing | |
|
Text with a horizontal spacing of 0 pixels: | |
|
Text with a horizontal spacing of 15 pixels: | |
Links
Links create a connection between more than one of your pages. Links also can connect your page to other pages across the World Wide Web.
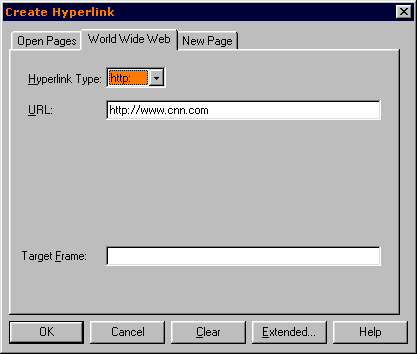
To link to a webpage other than your own, determine where you want to link to (For example, you might want the viewer to click on the words "CNN News" and have them sent to http://www.cnn.com). To do this, first highlight the text, picture, or both, that you want to be linked (in this case, we would highlight the words "CNN News"). Next click the Create or Edit Hyperlink Icon on the toolbar. (labeled above in green)
The Create Hyperlink Dialog Box should appear, as below. Choose the World Wide Web tab. Then make sure the Hyperlink Type List Box is set to "http:" on the Hyperlink Type List Box. Lastly, on the line titled URL type the address of the webpage. In this case we would type out http://www.cnn.com. Click the OK and presto you have just created a link that should look and work something like this link: CNN News.
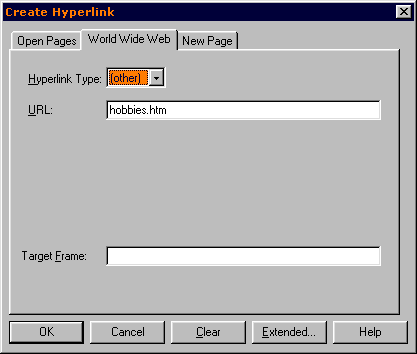
To link your own pages together, you first need to determine how the pages are to be connected. For example, you may want the viewer to click on the word "Hobbies", and have it go to a separate page of yours. To do this, follow the same directions as above: highlight the text and click the Create or Edit Hyperlink Icon on the toolbar (labeled above in green).
The Create Hyperlink Dialog Box should appear, as below. Choose the World Wide Web tab. Next, select "(other)" for the Hyperlink Type:. On the URL line type the name of your other page. In this case we would type "hobbies.htm". Once that is done you can click the OK and you will have created a link to another one of your pages.
You may want to include an e-mail link for your page. This will enable the viewers to click on your name and an e-mail program will automatically start with your e-mail address already in the send to line. To do this, you first need to highlight the text you want to link to your e-mail, which for the most part, will probably be your name. Like before you now need to click the Create or Edit Hyperlink Icon on the toolbar. (labeled above in green)
The Create Hyperlink Dialog Box should appear, as below. Choose the World Wide Web tab. Make sure the Hyperlink Type is set to "mailto:" on the Hyperlink Type List Box. On the line titled URL type the actual e-mail address. If the e-mail address, for example, was john.doe@thecoo.edu, we would type out "john.doe@thecoo.edu". Now click the OK and you have just created a link for your e-mail.

Click Here To Return To Webpage Help
 align
align align
align align
align